
HOW DO I LOG IN TO CO-MO CONNECT HALO?
- Launch the Co-Mo Connect HALO app.
- On the login page, enter your Email Address and Password, and then press “Sign In.”
- Start streaming!
SETTING UP CO-MO CONNECT HALO USER PROFILES
Once logged in, you will want to create a profile to get the most out of our Co-Mo Connect HALO service and enjoy all the features associated with the app across devices.
Your profile allows you to select your favorite channels for easy access in the Main Menu. You can select profiles for each family member in your home.
- On the Main Menu, press the up button until you see the person icon with the plus sign icon and the text “Create a profile.”
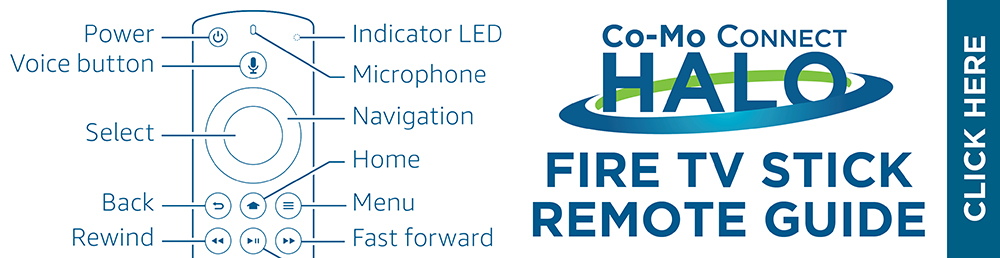
- Press the Select (middle button) on the Fire TV remote control.
- Give this profile a name. Typically, this will be the first name of the person using the app.
- Press Continue.
- Choose a profile picture. This is used to easily distinguish your profile from others.
- Press Save.
- Repeat this process for all profiles you would like to create.
When opening the app, choose which profile(s) you want to load.
A useful feature is the ability to check multiple accounts. The system will keep track of what you view together as users to make recommendations and improve the viewing experience for all users.
MAIN MENU NAVIGATION
When the app loads or you navigate to the Main Menu, you will be presented with a screen showing the Co-Mo Connect HALO logo at the top, along with a magnifying glass Search icon and a gear Settings icon. You will have a place to select/create a profile in the middle. Below that, you will have Menu options for Live TV, Profile Name, and Recordings.
Live TV
Under Live TV, you will see a sub-menu for On Now, My Channels, Catchup TV, and Trending Now.
On Now provides you a tile to view the streaming TV guide and shows what is currently airing on the first sixteen channels listed in your channel lineup. To view the guide, press the down button or scroll down to highlight View Guide, and then press the Select button. The half guide will display. To use the filters, press the up button to go to the top, and then use the Select button and directional buttons to make your selection. To view the full guide, press the right button. While in the full guide, you will be able to set up favorites, use filters, and jump to specific days in the guide.
The My Channels sub-menu shows a list of the sixteen most viewed channels associated with the profile(s) currently being used. The currently airing program will show, and you can navigate to the tile of that program and press Select to tune to that channel.
Catchup TV will show a list of all programs that have previously aired but are able to be viewed after the original airing. You can play a listed program from this screen by navigating to the tile and pressing the Select button. You can also view a full list of Catchup TV programs by highlighting the Catchup tile and pressing the Select button. In this view, the Catchup TV programs that are available will be presented by channel. The filters at the top can help you arrange the programs to your liking.
Trending Now shows the programs that are popular among all Co-Mo Connect HALO subscribers at the time you are viewing Co-Mo Connect HALO. Trending Now provides you with suggestions for programs you may be interested in viewing.
Free Previews menu shows all of Co-Mo Connect’s current free previews of channels you may not subscribe to.
Profile Name
The middle Menu option is labeled with the name of your profile(s). Only that name will display if one person is checked in (e.g., John). If two are checked in, it will display Profile & Profile (e.g., John & Jane). If more than two are checked in, it will display Profile & x others (e.g., John & 2 others).
The sub-menu for this Menu option includes Favorites, My Channels, and Our Recordings.
Favorites will display a list of the first sixteen Favorite channels set up in the channel lineup. You may navigate to view one of these channels by using the directional buttons and the Select button. You will see a View All tile. Selecting this tile will jump to the half guide with Favorite Channels selected as a guide filter.
The My Channels sub-menu shows a list of the sixteen most viewed channels associated with the profile(s) currently being used. The currently airing program will show, and you can navigate to the tile of that program and press Select to tune to that channel.
Our Recordings is another way to access your Cloud HD-DVR recordings.
Recordings
The recordings Menu option displays Recordings on the account. This is not tailored to profile but a full list of everyone’s recordings on the Cloud DVR.
If you are subscribed to the Cloud HD-DVR service, you can record up to 100, 200, or 300 hours of programming, depending on the tier you ordered. Please call 844-99-FIBER if you have questions about Cloud HD-DVR or want to upgrade/order Cloud DVR service.
To record a live program, you must tune into the channel and press the left arrow (Info). In this view, you will see the information about the current airing program and any upcoming airings of the same program. You will be presented with options to Watch Live, View Upcoming in more detail, and Record.
When you press the Record button, you will be presented with the option to Edit record settings. You can choose to record only this episode or record the entire series. When selecting Only this episode, you will be presented with Channel & Time, whether you would like to modify when to stop the recording, and how long to keep the recording.
When selecting to record the entire series, you will be presented with the options of First run & rerun or First run only, the channel number, the time, when to stop the recording, and how long to keep the recording. If you select Keep until space is needed, the recording will be subjected to being overwritten when you have fully utilized the subscribed hours. If you select Keep Until I Erase, the program will be saved, even if you fully utilize the subscribed hours.
Lastly, you can choose whether to Record or Don’t Record. If you select Record, a message will appear in the top right as “Recording” followed by the name of the program. If you select Don’t Record, you will be directed back to the previous Info screen.
To view your recordings, navigate to the Main Menu by pressing the Menu button (three horizontal lines), and then use the directional arrows to navigate to Recordings. Select the record you wish to view and press the Select (middle) button.
To manage your recordings, navigate to Manage in the Recordings menu option and press the Select button. Here you can view existing recordings as well as look at scheduled recordings. For existing recordings, you have the option to play, save, or delete recordings. Saving Recordings will ensure they are not overwritten when you fully utilize your subscribed hours. When you press Delete, you will be asked to confirm if you want to delete it. Recordings that are deleted cannot be recovered.
Favorites
Once you have a profile set up, Favorite Channels can be configured by first navigating to the Guide. This can be done from the Main Menu under Live TV > On Now > View Guide or if watching the video, pressing the Select button and then the right button. You will be presented with a guide that takes up half the screen. To view the full guide, press the right button. Once in the full guide, use the up button to take you all the way to the top (above the first channel in the list). Use the right button to highlight Favorite Channels and press the Select button.
A list of all channels and their associated logos will appear. Use the down arrow to go through the list, pressing the Select button for the channels you want to mark as Favorite. The heart image will fill in to indicate it has been stored as a Favorite. To remove a Favorite, highlight a channel with a filled-in heart and press the Select button. The heart will show as unfilled.
Once you are satisfied with the channels you’ve marked as a Favorite, press the back button to navigate to the full guide.
Guide Filters
While in the full guide, you can use filters to tailor the guide to your preference. Use the up button to take you all the way to the top (above the first channel in the list). You can use the Filter By option on this top row to filter the guide by All Channels, Subscribed, Playable on This Device, and Favorites. The Select button will open the list of options, go up or down to the option you wish to use, and press the Select button. Subscribed and Favorites will likely be the most used filters. You can also filter by Channel Type, which included the options All Channels, Broadcast (local over-the-air), Cable (not local over-the-air), Network, and Premium (movie channels 400-466). The Select button and directional buttons work here, too.
The Quality filter does not appear to function as expected at this time, so it can be ignored. If you arrow all the way to the left, you will see that the word TODAY is highlighted. When you press the Select button, a list of days will display. You can jump to days in the guide (7 days backward and 13 days forward). This improves the experience using the guide since you do not have to use the right arrow a lot to get to previous days or upcoming days. When you find the day you want to view, press the Select button.
Settings
In the app’s settings section, you can name the device you are using, view all devices associated with your account, modify recording options, set parental controls, and set other options. This is also where you will go to sign out of the app if you choose to do so.
To navigate to the Main Menu, press the Menu button (three horizontal lines). Then use the directional buttons to navigate to the gear icon. Press the Select (middle button) on the Fire TV remote control. The Settings sidebar will show on the right side of the screen. Below is a hierarchy of options available to you.
- Accounts Settings
- Sign Out: Sign Out of the app.
- Device Settings
- Name: Use can rename the device you are currently using.
- On-Screen Language: This is set to English (United States) by default and cannot be changed.
- My Devices: You can view all devices that have been signed into your account. You have the option to sign out of individual devices or sign out of all other devices.
- Stop recordings
- You can set an account-wide rule to change when to stop recordings. You can select At the scheduled end time, 5 minutes after, 15 minutes after, etc.
- Parental PIN Controls
- Content locks
- Here you can set a PIN and modify content ratings you wish to require entering the PIN to view. You can set this for Unrated content, by MPAA movie ratings, and by US TV ratings.
- You can also reset the PIN.
- Purchase locks
- Here you can set a PIN and modify whether you want to require a PIN to purchase VOD programming.
- You can also reset the PIN.
- Adult Lock
- Here you can set a PIN and modify whether you want to Hide Adult Content.
- You can also reset the PIN.
- Display
- Closed Captions: You can turn this feature on or off. This will apply to app programming on the app.
- Playback Quality: You can select the Playback Quality you would like to use (Best, Better, or Good). Our recommendation is that you use Best, which is the default setting.
- Audio
- Descriptive Audio: You can toggle this setting on and off. When on, programs that have a descriptive audio track will be enabled.
- Last Watched
- You can toggle this setting on and off. When on, a list of the last viewed channels will be presented when you press the up button while live video is playing with no other overlays on the screen. It is a quick way to jump between channels without having to navigate the guide.
- System
- Network Info: This shows the device’s IP address.
- System Information: This shows information about the app, such as the In-Home Status, Version number, etc.
- System Update: This button will search for any setting changes that have not automatically reached the app.
- Restart System: This button will force close the app and then open it again.
- Android TV Settings: This option will take you out of the app to the device’s Settings section.
- Content locks